How to run Windows 10/11 Professional on Digital Ocean Cloud Virtual Machine from Scratch
Steps to run a Windows machine on Ubuntu based Digital Ocean Droplet
Part 1: Create Ubuntu droplet (VM1) for preparing the Windows Image
1. Create Ubuntu Virtual Machine on DigitalOcean
- Choose Ubuntu 22, 24 or any LTS support version. I chose Ubuntu 22.04 (LTS) x64.
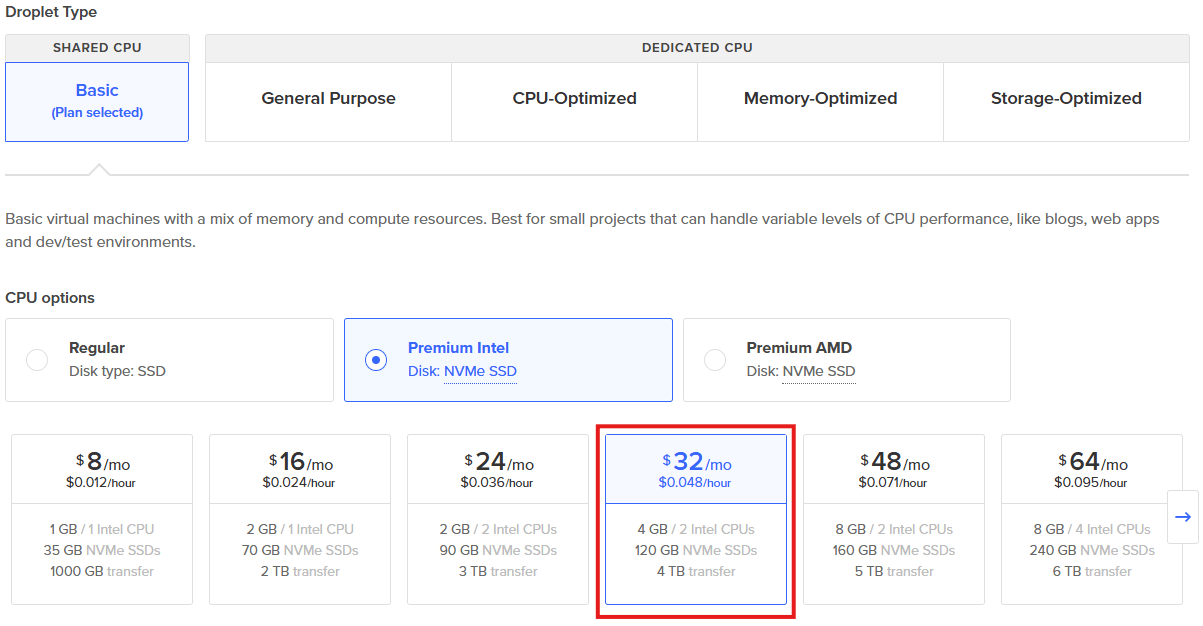
- Specs: 4 GB Memory and 2 CPUs as shown in the SS. This is minimum requirements I have taken for preparing Windows 10 Professional Image. You can take higher droplet specification if you want for Windows 11 Professional or any.
- Choose Password based Authentication instead of SSH Key.
- Set and remember the password for later login to this droplet. Lets call this droplet as VM1.
- Hit Create Droplet button at the bottom.
2. SSH into the VM
Open the terminal and SSH into the droplet (VM1) using the below command. Replace the <VM1_IP> with the public IP assigned to your droplet.
$ ssh root@<VM1_IP>
- Enter the password which you set while creating the droplet (VM1).
3. Install Required Packages
After login to your droplet in Step 2, use the below commands and install the required packages
$ apt-get update && apt-get upgrade -y
$ apt-get install xfce4 firefox xrdp gzip -y
$ apt-get install qemu qemu-utils qemu-system-x86 -y
$ echo xfce4-session > ~/.xsession
$ reboot
In case of error while installing Qemu in the 3rd command, use the below command. Or Google it to get the similar command for installing that.
$ sudo apt-get install qemu-system-x86 qemu-utils qemu-kvm -y
4. Connect to Droplet using local GUI client
– Linux: If you are using Linux in your host machine and you have Remmina application installed, then skip the below Remmina installation (next three) commands for Ubuntu. Otherwise first install Remmina using below commands (Below commands are for Ubuntu/Debian, you can find similar commands for your Linux distro):
$ sudo apt update
$ sudo apt install remmina
$ sudo apt install remmina remmina-plugin-rdp remmina-plugin-vnc remmina-plugin-secret
and then proceed with further steps for Linux.
- Open Remmina → Enter VM1 IP → Hit Enter → Full screen by clicking on the button (shown in SS) → Enter Username:
root, Password: VM1 password
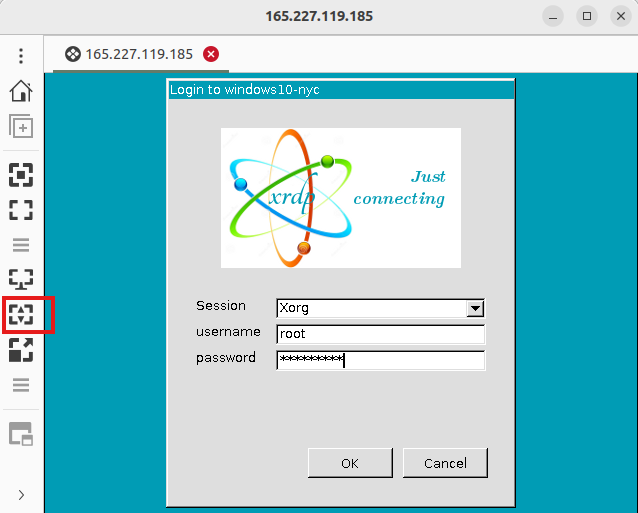
– Windows: If you are using Windows OS in your host machine, then simply follow below steps:
Open Remote Desktop Connection → Enter VM1 IP → Username: root → Click Connect.
In xrdp session, enter the Username: root and Password: VM1 password
5. Download the following:
After login into the droplet, open the browser and download the following iso in the machine (it will be downloaded in /root/Downloads). I am preferring Windows 10 Pro for this blog. You can download any Windows of your requirement. Also make sure your droplet VM1 (created in Part 1) should have that minimal requirements specifications (RAM and CPU) for your preferred Windows:
In case the download failing or any issue, close the RDP session and simply download these in your local PC. After downloading both in your local machine, follow next step.
6. Transfer ISO Files to the Droplet
If you are unable to download the files directly in the droplet in Step 5, you can download those iso files in your local PC and copy those into the droplet using below commands. The same commands will work for Windows users too. Replace the <VM1_IP> with your droplet public IP:
$ scp virtio-win-0.1.271.iso root@<VM1_IP>:/root/Downloads
$ scp Windows_10.iso root@<VM1_IP>:/root/Downloads
PS: This will take little longer based on your Internet Speed.
Part 2: Prepare Windows Image
7. Create a Virtual Disk
Open the terminal and SSH to your droplet (VM1) as done in Part 1 (Step 2). Run the below commands and create a virtual disk of the required size. This disk size will be the System Directory (Local Disk C) for installing Windows. You can give the required size as per the requirements for your preferred Windows you want to install. In my case I am installing Windows 10 Pro, where 80 GB is good enough to install it. Later on, the extra storage remaining out of 120 GB can be used for creating new disk from the installed Windows in further steps.
$ cd Downloads
$ qemu-img create -f raw wins_harddisk.raw 80G
$ ls
Check whether that all the three files are in this Downloads directory:
- wins_harddisk.raw
- Windows ISO
- Virtio ISO
8. Run QEMU Emulator
To install Windows in this Virtual Hard Disk, run the Qemu Emulator using the below command. Replace the <windows.iso> and <virtio.iso> with the corresponding iso file names:
$ qemu-system-x86_64 \
  -m 3000M \
  -cpu host \
  -enable-kvm \
  -boot order=d \
  -usbdevice tablet \
  -drive file=wins_harddisk.raw,format=raw,if=virtio \
  -drive file=/root/Downloads/<windows.iso>,media=cdrom \
  -drive file=/root/Downloads/<virtio.iso>,media=cdrom \
  -vnc :1
Note: You can see that I have used 3000M in above command, that represents I will be using 3000MB (out of 4GB) of RAM for QEMU to help me install Windows in that wins_harddisk.raw file. You have to be careful, for choosing this RAM size depends on your Windows version you are installing, as some part of RAM is also reserved by the droplet for itself. So, it may kill the running QEMU.
PS: This command will not print anything on the terminal, it will simply run without any output. But if you see warning or error as below. Simply ignore.
[W][07182.032853] pw.conf      | [          conf.c: 1031 try_load_conf()] can't load config client.conf: No such file or directory
[E][07182.033604] pw.conf      | [          conf.c: 1060 pw_conf_load_conf_for_context()] can't load config client.conf: No such file or directory
For,
- Linux User: Open Remmina Desktop Client → Select VNC → Enter
<VM1_IP>:5901→ Hit Enter - Windows User: Download the RealVNC Viewer Application using below link:
- RealVNC Viewer
- Open RealVNC and Enter
<VM1_IP>:5901→ Hit Enter
Replace <VM1_IP> with public IP of the droplet. It will take some time to load the installation screen for proceeding with further installation steps. Keep checking in case Qemu which was running is still running. In case, it may be killed you have to rerun it with different RAM size. Qemu should be running till the complete installation and configuration of Windows in next few steps.
9. Load VirtIO Drivers
Follow the on screen steps and choose the Custom: Install Windows only (advanced) method and reach to the screen of disk creation. You will not see any disk over there. We have to first install few drivers and then we will get the empty wins harddisk 80 GB which we created in previous step.
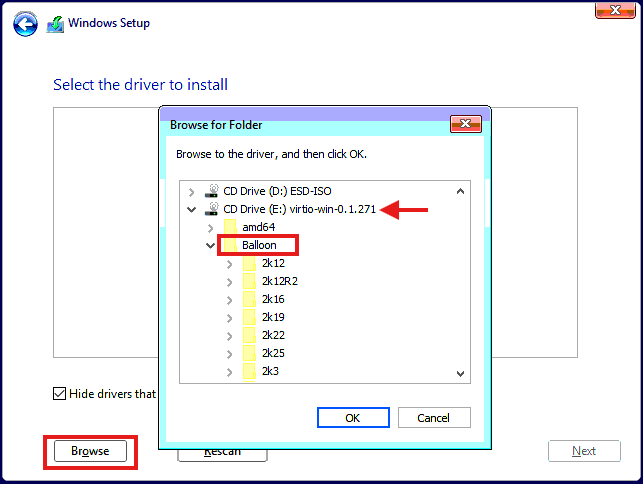
Click Load Driver → Click Browse → Enter the VirtIO CD (shown in SS) → Select Balloon
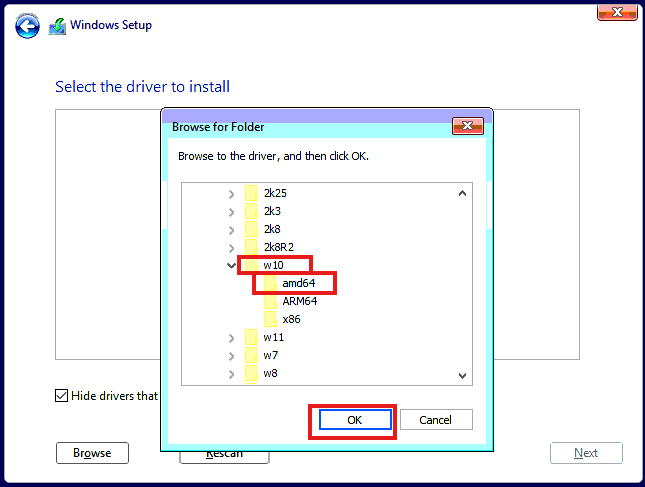
→ Select w10 (Select according to your version of windows you are installing) → Select amd64 → Click OK → Remove the check from Hide drivers that aren’t compatible with this computer’s hardware from the bottom.
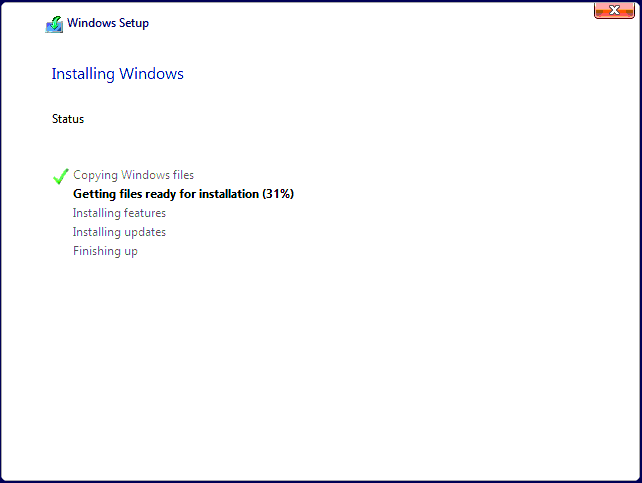
→ select first path → Click Next to install
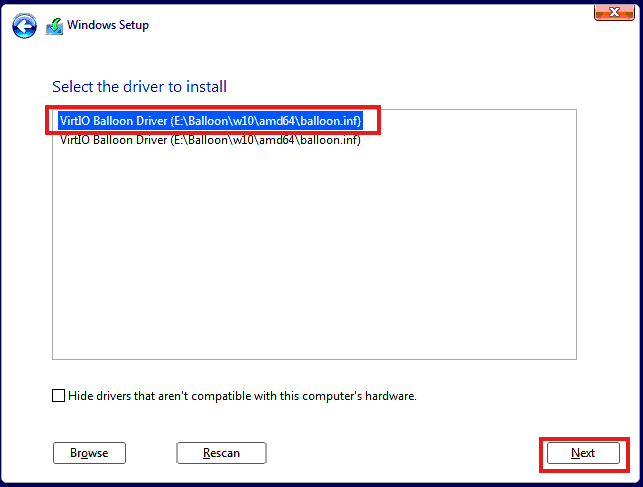
– Repeat this Step 9 for remaining drivers listed below from VirtIO CD:
BalloonNetKVMvioRNGVioSCSIVioStor
– After installing all the above drivers, the virtual disk will be displayed as shown below.
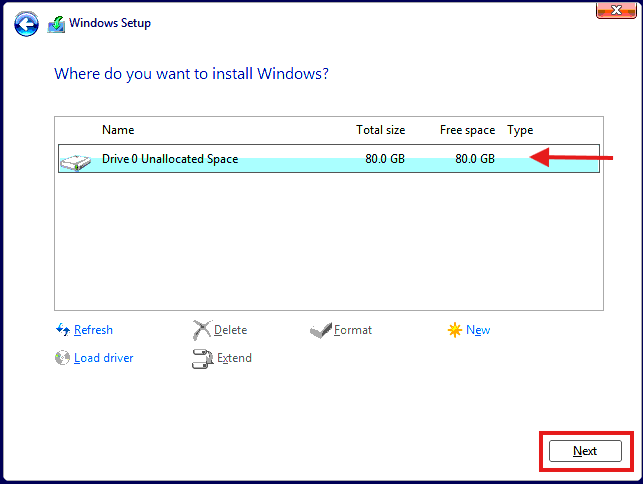
→ Select the disk → Click Next to install
→ Complete the installation and give a Username for your Windows machine and select a STRONG password (Use combination of alphabets, numbers, special symbols). Remember both the Username and Password.
PS: Strong Username and Password for Windows Machine will help protect from active scans and attacks.
Part 3: Windows Configuration
10. Inside Windows Desktop
After installing the Windows, configure the below settings:
-
Go to Start menu, and search Remote Desktop Settings (as in System Settings), hit Enter. Toggle it on.
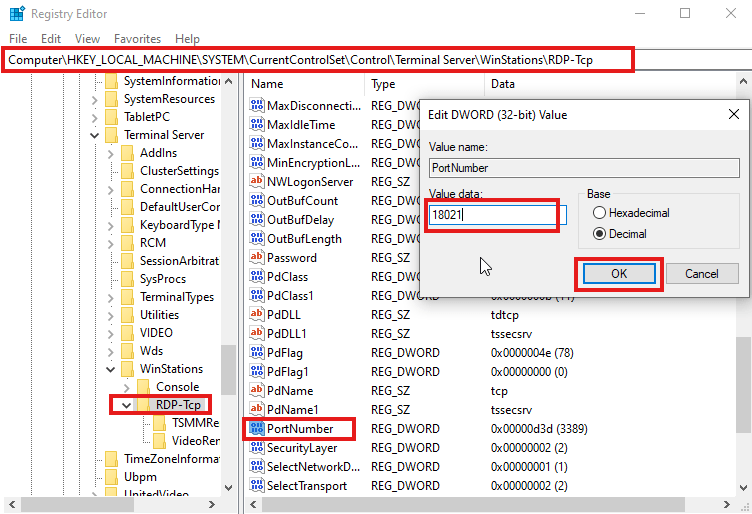
- Change the RDP default port to some random port:
- Open regedit from Start menu search
- Navigate to:
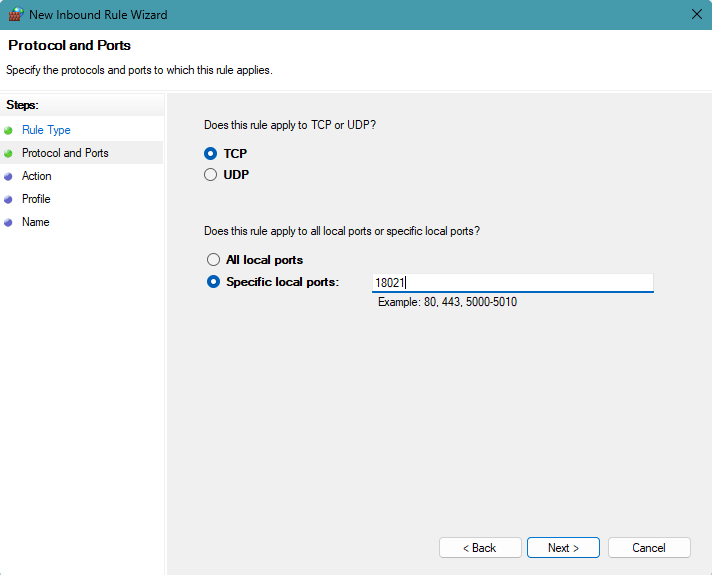
HKEY_LOCAL_MACHINE\System\CurrentControlSet\Control\Terminal Server\WinStations\RDP-Tcp - Modify PortNumber field value from 3389 to 18021 (Decimal)
- Firewall Rule
- Open Windows Defender Firewall with Advanced Security from Start menu.
- Select all (Ctrl + A) the inbound rules and click Disable Rule on the right pane to disable all inbound rules.
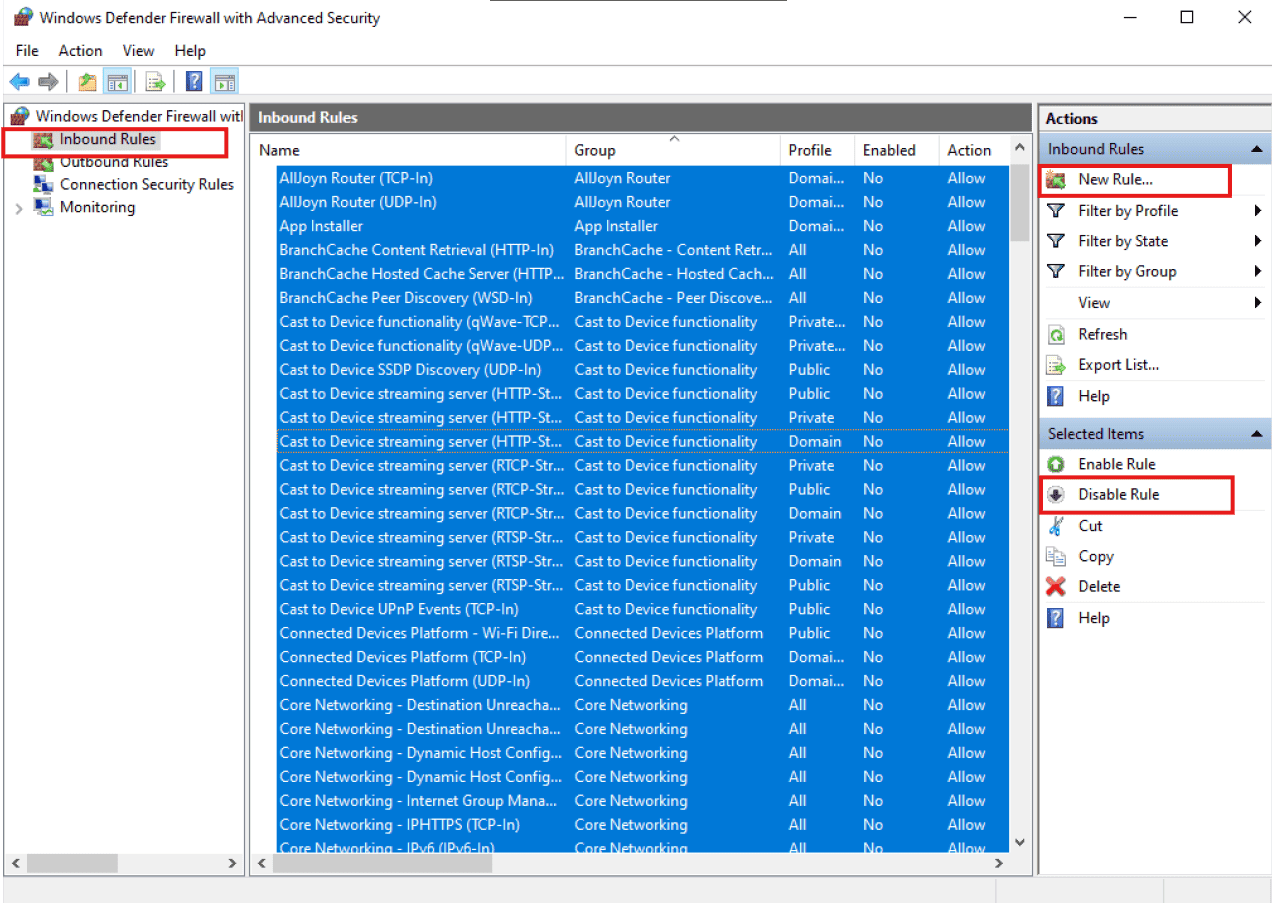
- Click on New Rule to add a new Inbound rule.
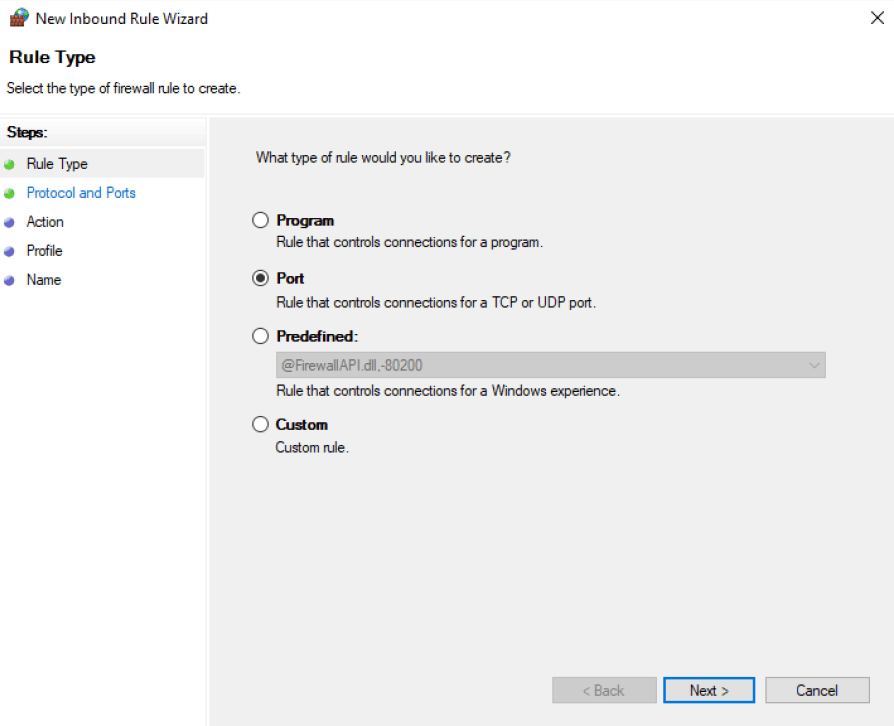
- Allow inbound TCP port 18021 (Domain, Private, Public). Next, next.. keep everything default.
- Name: Rule 18021 for RDP
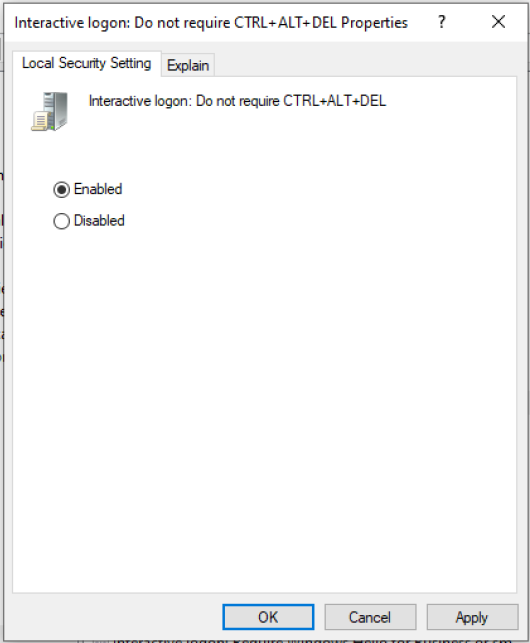
- Disable Ctrl+Alt+Del requirement at lock screen
- Open Local Security Policy in the installed Windows.
- Navigate to Local Policies\Security Options.
- Find the Interactive logon option for CTRL+ALT+DEL. (as shwon in SS below)
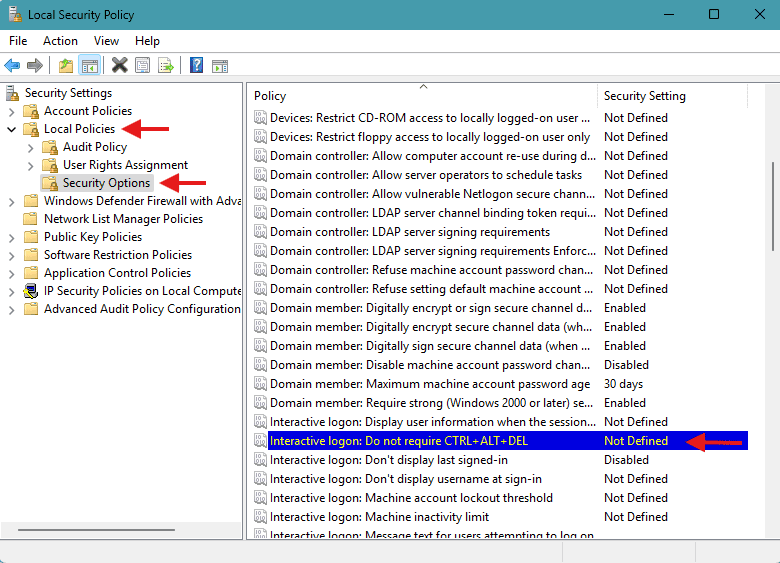
- Double Click and Enable it.
- Shutdown the machine
Part 4: Compress Windows Hard Disk and Use it
Login to the droplet using SSH as done in Part 1 (Step 2), in case you close the logged in SSH. Go to the Downloads folder where you have your wins_harddisk.raw file.
11. Gzip the Virtual Hard Disk
Compress the wins_harddisk.raw file and give a name as shown in below command. Give proper name for the .gz file in the below command replacing
$ dd if=wins_harddisk.raw status=progress | gzip -c > <windows>.gz
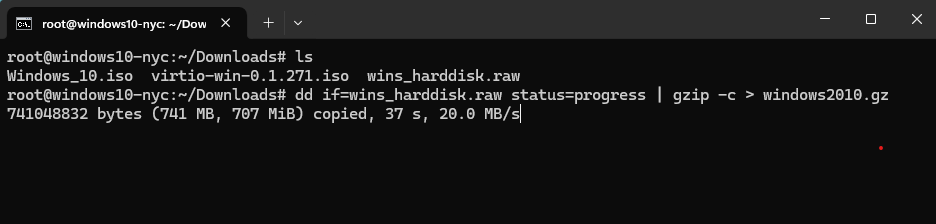
Be patient, this will take time to complete.
13. Install Apache and Move .gz the compressed file to Web Directory
We will use Apache to download this compressed disk file to the droplet where we want to install and run Windows.
$ apt install apache2
$ ufw allow 'Apache'
$ cp windows2010.gz /var/www/html/
Check if you are able to download the compressed Windows file using the below URl from any different PC. Replace <VM1_IP> and <windows> as per your VM1 IP and your compressed filename you have given in previous step respectively.
$ curl http://<VM1_IP>/<windows>.gz
You can preserve this file, store it in your local by downloading or any web location from where can easily download for later use anytime you want a Windows machine on Cloud. Because later on we are going to delete this droplet VM1.
Part 5: Create New Ubuntu droplet (VM2) for running the Windows
This is crucial step where we are actually going to uncompress the .gz windows disk and start using Windows.
14. Create New Droplet (VM2) on DigitalOcean
Select the minimum requirements according to your Windows version you chose in previous step. Since I used Windows 10 Pro. The following specs was good enough for me to run it. The same steps to be followed as in Part 1 (Step 1) for creating droplet.
- Specs: 4GB RAM, 2 CPUs
- After droplet is successfully created. Turn it off.
- Go to Recovery tab → Select Boot from Recovery ISO.
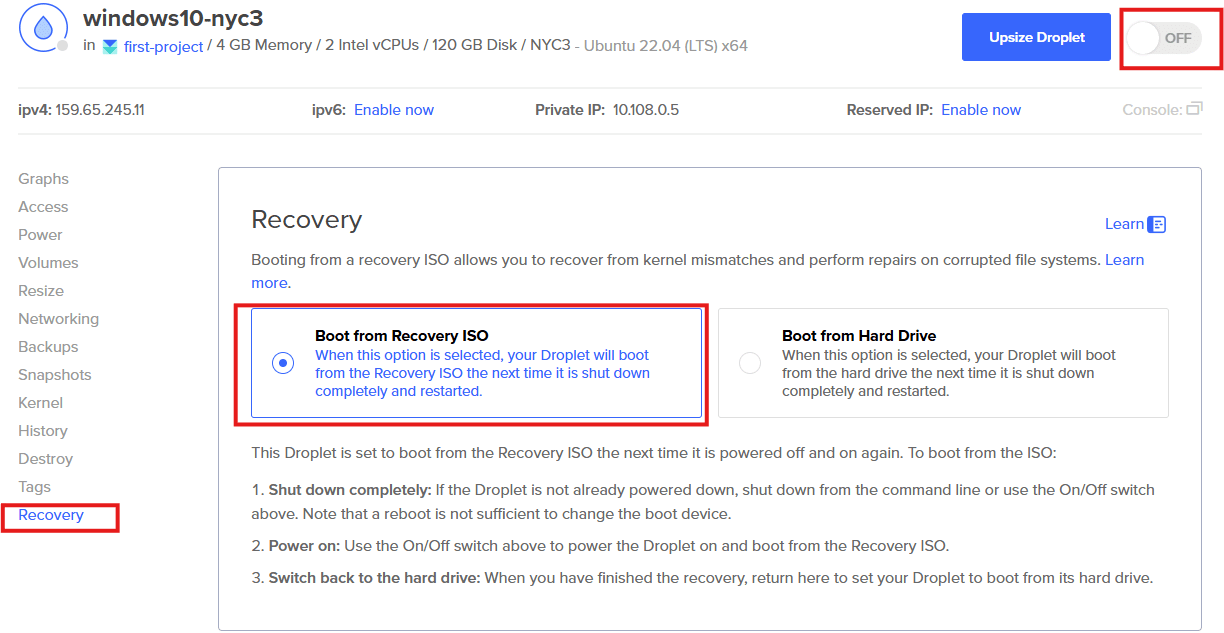
- Turn on droplet.
- Open Recovery Console from top right, below droplet On/Off toggle button.
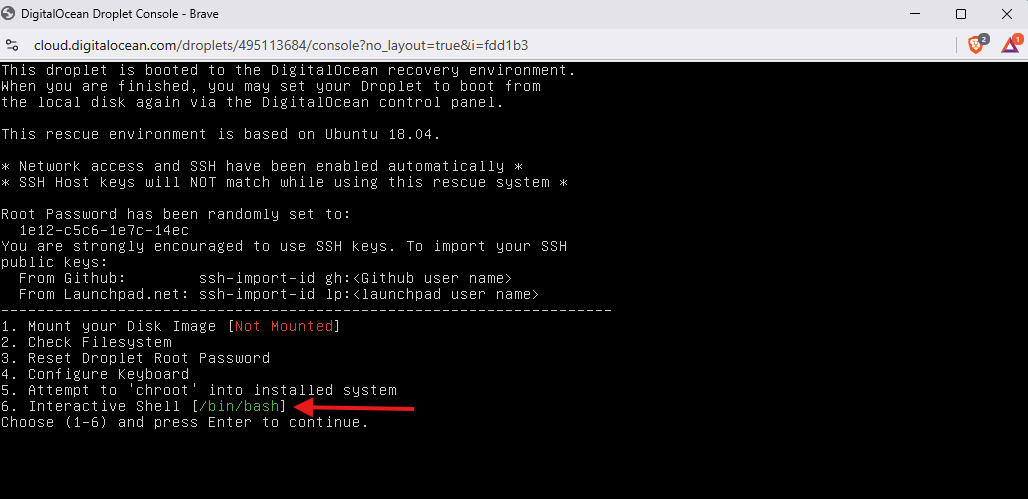
15. In Recovery Console
-
Press 6 to get bash prompt for Interactive Shell.
-
Check disk name:
Run the below command and check the disk name whether its vda or sda. In my case, its vda.
$ ls -la $ lsblk -
Download and write Windows disk:
Replace the <vda/sda> with vda or sda depends on you disk name.
$ wget -O- http://<VM1_IP>/windows2010.gz | gunzip | dd of=/dev/<vda/sda>
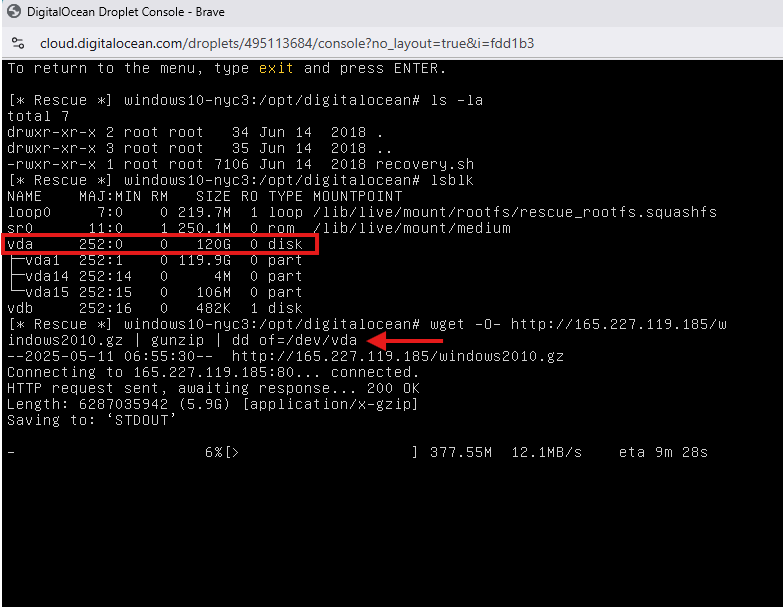
Be patient, sit back and relax! Its almost done. This step gonna take time in this new droplet VM2. When its done, close the console.
16. Switch back to Boot from Hard Drive
After the download finishes, you are done:
- Turn off the droplet (VM2)
-
Switch back to Boot from Hard Drive
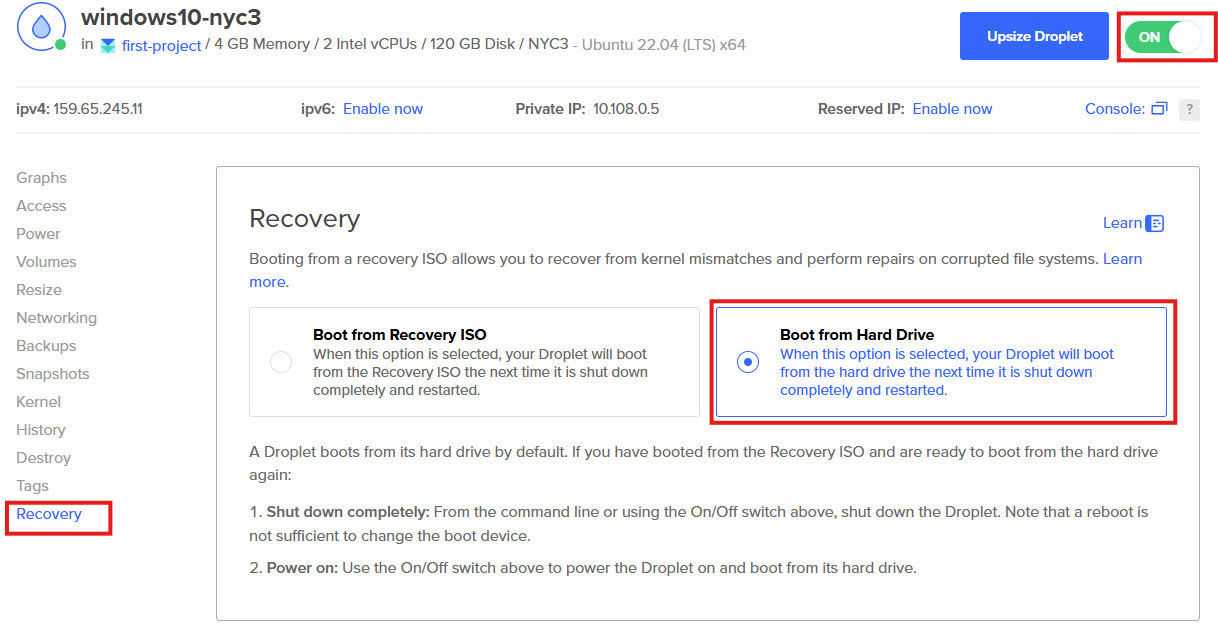
- Turn on the droplet.
Part 6: Network Configuration in Windows
To configure internet in the Windows machine on droplet VM2, follow the below steps:
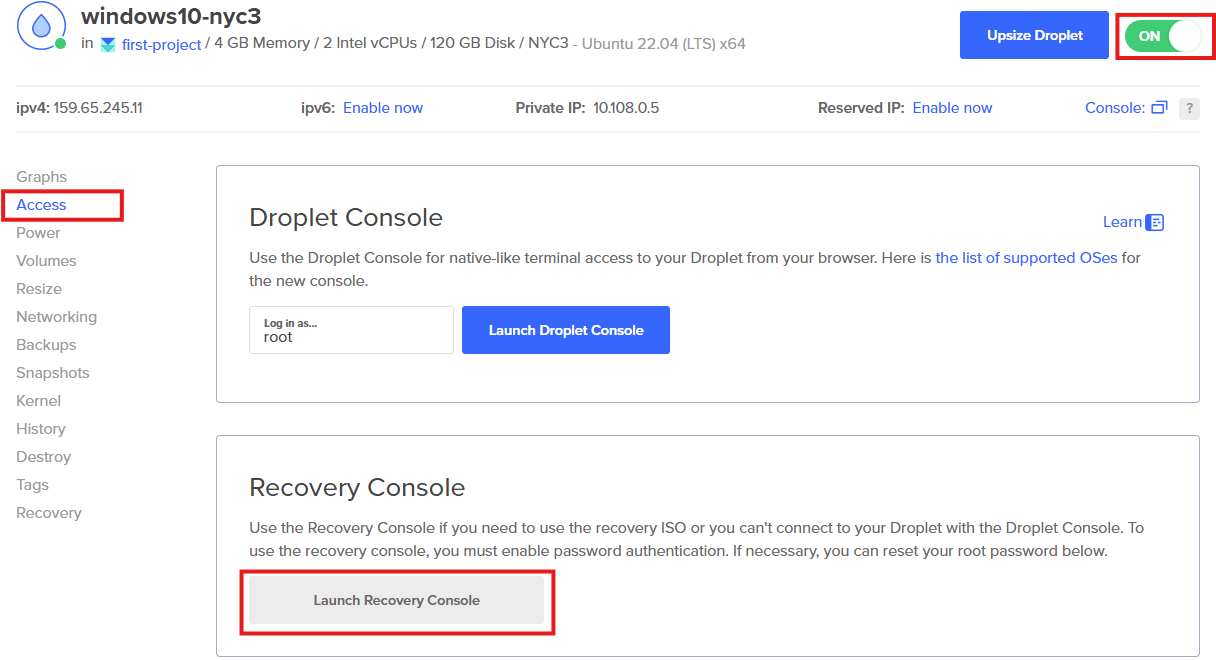
-
Go to Access tab and click Launch Recovery Console to open Windows in recovery mode.
- Go to View Network Connections from Start menu.
- Double click first Ethernet interface Ethernet Instance 0 2 and go to Properties.
-
Go to Internet Protocol Version 4 (TCP/IPv4) > Properties and give the IPs and Gateway manually, same as displayed at the bottom.
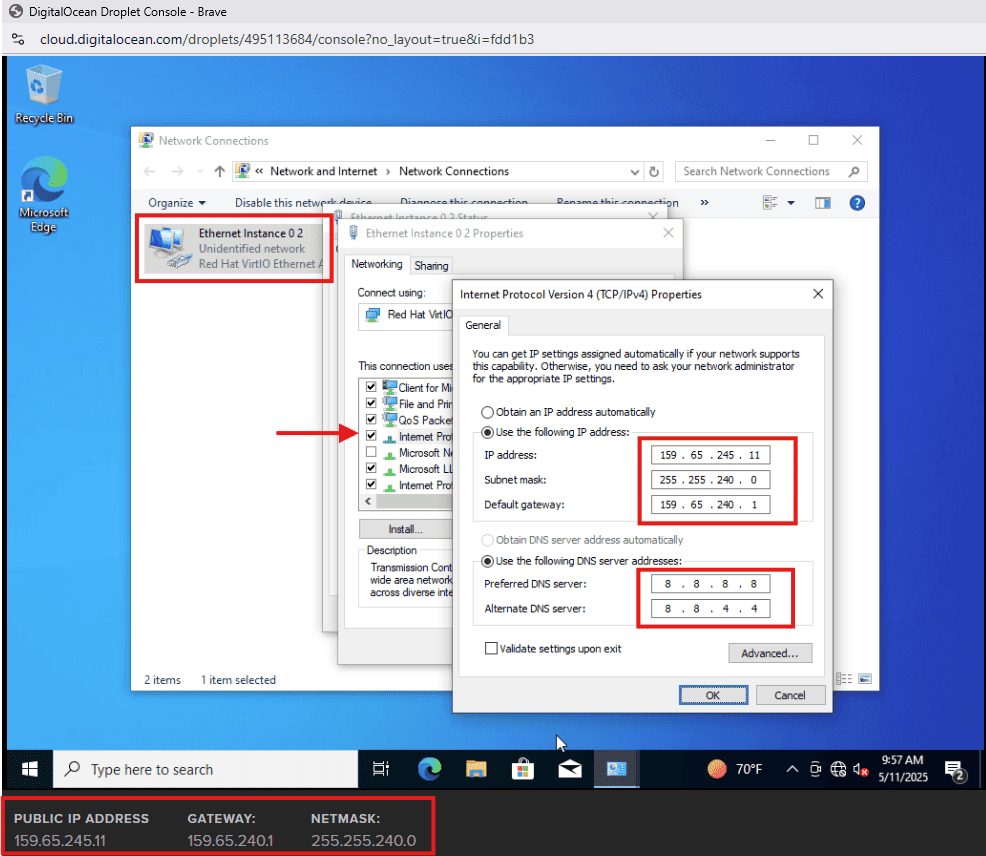
- Set:
- IP address
- Subnet mask
- Default gateway
- Preferred DNS server
- Alternate DNS server
Note: You can keep the DNS same as shown in the SS. That is Google DNS IP 8.8.8.8 and alternate DNS as 8.8.4.4
- Click ok and save and wait. If the internet works great, otherwise try the same with other Ethernet interfaces.
- Close the recovery Window.
Part 7: Hurray, finally you have configured your Windows machine on droplet
- Linux User: Use Remmina Client
- Select RDP and enter the VM2 IP address and Port in the format
ip:portwhich you had configured for RDP on Windows Machine. Hit Enter. - Enter the Username, Password and Click OK and start using.
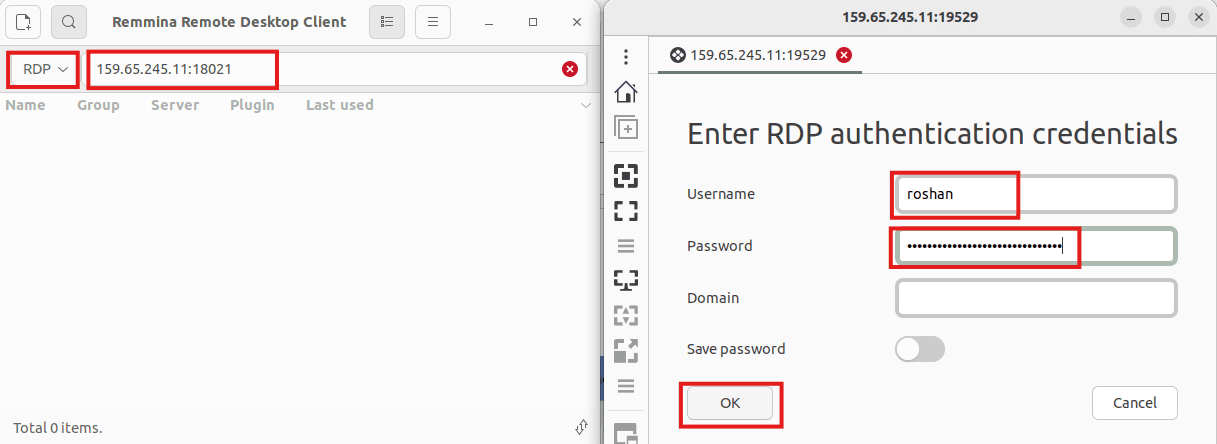
- Select RDP and enter the VM2 IP address and Port in the format
- Windows User: Use Remote Desktop Connection
- Enter the VM2 IP address and Port in the format
ip:portwhich you had configured for RDP on your Windows Machine. - Enter the username. Click Connect.
- Enter the Password.
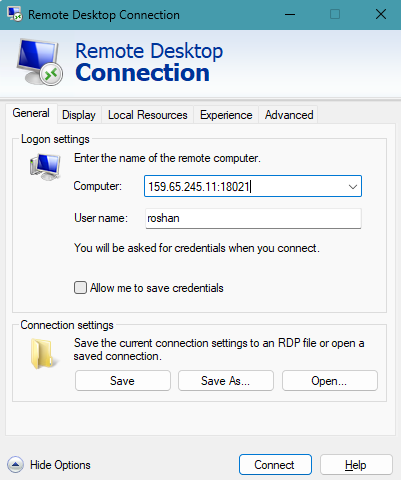
- Enter the VM2 IP address and Port in the format
Start using your Windows on the droplet VM2. You can preserve that windows10.gz file for later use and you can remove the droplet VM1 which you created in Part 1 for preparing Windows Disk.
Part 8: Allocate Unused Storage (Optional)
- Open Create and format hard disk partitions from Start menu.
- Create the disk out of unallocated space (if any).
Part 9: Conclusion
Finally, we have successfully configured the Windows 10 on the Digital Ocean droplet from scratch. The same procedure can be followed for running any version of Windows.
Thank you ![]() and Stay tuned for more blogs
and Stay tuned for more blogs